Monday, December 10, 2012

Enhance your eye color

Ladies,
 
You know when you wear a certain color top and you just love the way it brings out your eyes?? Well, your makeup can do that, too! Depending on what color shadows or liners you wear, your eye color can really pop and look beautiful and dramatic!  Here are some tips:
 
 
Plum or purple shadows with their red undertones make green appear more vibrant because red is opposite green on the color wheel. Sweep a cream shimmer color across the brow bones to highlight and draw every more attention to your eyes.
 
The intensity of a dark blue or charcoal shade is a sharp contrast to light or bright blue eyes. A sweep of a rose or pinky color on the brow bones keeps the look from being overpowering.
 
A touch of gold shimmer from the inner lid to mid-lid will make brown appear richer. A dark brown color applied mid-lid to outer lid adds a darker contrast that compliments the gold.
 
 
Hope you enjoy!  Make sure you experiment with your eye color :)
 
XO
        Kate

Sunday, December 2, 2012

Favorite Lipsticks

Good evening ladies <3

So, I wanted to share what my favorite lipsticks are to wear this time of year.  Usually, I'm all about the hot pink and the baby pink lips, but I love switching it up with some pretty plum and deep maroon colors.  Of course, nude lips always look amazing no matter what time of year :)

Here are some of my favorites right now:
 
 
"Creme Brulee" by Revlon
"Whisper" by Victoria's Secret
"Athena" by NYX
"Castle" by NYX
"Waterviolet" by Clinique
"Good Year for Wine" by Ulta Brand
"Cherry Tart" by ELF
 
To see what the colors actually look like, here are some swatches :)


When wearing a bold color on your lips, it's important to prep and prime your lips before applying the color. If you don't, the color will appear chunky or cracked on your lips. 
You definitely don't want that!
So, in order to avoid that, I exfoliate with my Lip Exfoliator by ELF cosmetics.  This clears away any dead skin and smooths cracked lips.  Then, I apply a lip balm (I use any of my EOS balms).  Sometimes, I'll even dab concealer on my lips to mute out the natural color of my lips, so that it doesn't change the actual shade of the lipstick.  You can also use a lip primer to keep you color lasting all day, if you'd like. 


Please share your favorite lippies, too!!
<3
 
XO
         Kate

Monday, November 26, 2012

My Winter Wishlist!

                Hey ladies!!
 I hope everyone had a fantastic Thanksgiving and survived Black Friday!  Did anyone get any amazing deals?!?! Since I work every year on Black Friday, I never get the chance to go out and shop. With the holidays coming up soon, it got me thinking about what I would love to 
splurge on this season.

As you know, I am a total girly-girl and love pink and anything in pink packaging! :)
  • The Viva La Juicy fragrance is one that I loved from the first time I smelled it...... and how can you resist the incredibly cute bow on the bottle??
  • I also would love a white Apple Mini Ipad to match my Iphone.  It would be great to have this tablet to take with me since I travel back and forth to Massachusetts quite a bit.
  • OMG do you just not love love love these Betsey Johnson pink & cheetah pumps? I fell in love with these the second I saw them.
  • I've heard so many people rave about the Sedona Lace Midnight Set makeup brushes.  The set includes a round top powder brush, a flat top powder brush, an angled top powder brush and a kabuki brush.  And of course, they're pink!!
  • Urban Decay's Naked palette is something I've had my eye on for a while.  I debated between the Naked palette or the Naked 2 palette, but I think I like the colors in the original palette a little bit better. Plus, it comes with an eye primer!
Tell me what you ladies think of these items and if you have them!! I would love your opinions!!
 
XO
           Kate 

Sunday, November 18, 2012

Ulta Haul!

Sooo I went on a little haul at Ulta, one of my favorite places to shop!!  I picked up a few odds & ends that I use all the time and a few items that I just needed to have :)
 
 
#1- Justin Bieber Fragrance.  I had my eye on this for a while. I love the scent and love the bottle! It's so cute and feminine :)
#2- NYX waterproof eye pencil in black- I was looking for an eyeliner that was waterproof to last me all day, and since I love NYX products because they are cruelty free, I got this one. It's more of a crayon texture and glides on smoothly.
#3- NYX lipstick in shade 542 Athena.  I fell in love with this glossy nude color when I saw it.  I love rocking a nude lip with a smokey eye, and this lipstick is perfect to complete the look.  On top of it, all NYX products were BOGO 50% off!! <3
#4- Topganic Argon Oil- I love argon oil to treat my hair since it can get dry and frizzy in the colder weather.  This definitely does the trick, and it smells good.
#5- John Frieda's Frizz-Ease Heat Protective Spray.  Love this stuff! I spray this on my hair before I style it with any type of heat which protects if from the damage that heat causes.
#6- John Frieda's Frizz-Ease Curl Perfecting Spray.  I use this when I'm going to curl or wave my hair.  I'm not sure if I prefer the spray over the serum, yet, but I will let you know!
#7&#8- John Frieda's Smooth Start Shampoo & Conditioner.  This is the shampoo and conditioner I am currently using.  I like to switch up my shampoos and conditioners, often, so my hair doesn't get used to them, but I love these products!
#9- Physicians Formula Mineral Glow Pearls.  I was looking for a new highlighter, and I loved the way this one looked.  It has some shimmer and some bronzer mixed in, which I thought would blend perfectly with the rest of my look. I was right. I would recommend it!
#10- Four-piece Serving Set.  I got this as a FREE GIFT when I purchased the Justin Bieber Fragrance.  This glass set will definitely come in handy.
 
I'm going to have to go back to Ulta soon because I was just mailed my free gift options for being a frequent shopper! I have a few options on what to pick, so I will do another post when I pick up some more goodies :)  I would love to know if you guys use any of these products!!
 
XO
        Kate

Saturday, November 17, 2012

OOTD

Casual/Running Errands

 
Getting dressed up is a lot of fun, but sometimes you just want to be comfortable when you have running around to do.  Today was one of those days for me.... so I decided to throw this on!


I wore an over-sized, hi-low, button-down with a collar, rolled sleeves, and cute button detail on the back tail, as well.  I purchased the top at Bob's Stores.  They have some really affordable prices.  Underneath, I wore a plain black cami.  I paired the top with black leggings from Wet Seal, and of course, my grey Ugg boots. LOVE<3  I rolled the top of my boots over so a little bit of the fur was showing.  I finished the look with stacking my silver watch by Citizen, my spiked bracelet from Forever 21, and the Halloberry inspired bracelet that I made myself on one arm.  On the other, I rocked a few of my Alex & Ani bracelets and a magnetic, beaded bracelet (a gift from my beautiful cousin).  I skipped a necklace for today, but I matched my spiked bracelet with my spiked hoop earrings! They are big, but I love them.  Hope you enjoyed!!
 
XO
         Kate

Wednesday, November 14, 2012

Arm Candy

 
Stacking bracelets is a BIG trend this year.  I'm obsessed with this trend, and I love having "arm candy" that matches my outfits! Whether you're rocking silver or gold tones, complete any look with these steps:
 

Pick your statement piece.

 
Most of the time it's your biggest, more prominent, piece of jewelry.  For this look,  I chose a watch. 
 

Pick a Color.

 
Match your stack with the colors in your outfit.  For this look, I chose PINK! You can choose from beaded bracelets, rope bracelets, or bangles. 
 

Choose your "Extras".

 
Choose extra bracelets that you have to compliment your stack.  I chose a spiked stretch bracelet for my stack.  Spikes are VERY big this season! 
 

Choose your basics.

 
 These can be basic bangles or everyday pieces that you wear.  I love wearing either my Chamilia bracelet (because my boyfriend started it for me<3) or my Alex & Ani bracelets. 


And that's how you stack your "arm candy"!! Feel free to mix & match any colors
 and textures you want! Make it you OWN!!!
 
XO
         Kate


My Stack consists of:
 
-Rose Gold watch from mark.
-Pink Halloberry inspired bracelet made by me! Scroll below to see my tutorial.
-Spike bracelet from Forever 21
-Basic gold-tone bangles from Charlotte Russe
 

Friday, November 9, 2012

Giveaway!!!

Hi Ladies!!
I hope you are going to LOVE this giveaway as much as I do :)
I'm giving away the Party Girl Palette from BH Cosmetics!
 

This palette has very pretty colors! - some matte & some shimmer. Great for everyone, whether you're a beginner with makeup or an experienced makeup artist!
 
The colors are super pigmented, too!  I own this palette myself, so I snapped a picture of that royal blue color in the corner to show you! These colors are amazing.
 

Make sure you ENTER THE GIVEAWAY by doing the following:
-Be sure to be following my blog.  You can follow by email :)
-Follow me on twitter --> kateeex_15 
-Follow me on instagram --> XOkate15

Winner will be announced November 17th, so anyone can enter until then :)

Thanks ladies & GOOD LUCK!! <3
 
XO
         Kate

Tuesday, November 6, 2012

DIY Helloberry Inspired Bracelets

Hey ladies!!  
 If you're like me, you LOVE Helloberry bracelets but they can be expensive and you just don't want to spend the money on them.  So, I decided to make one myself!!
 It's very simple, and they look almost identical!!
Here is what you will need:
Plastic Lace in any color [aka Hemp], Jewelry Chain [Silver or Gold & in any size you prefer], Scissors, Pliers, Tape, and Glue

STEP ONE:

Measure the chain to the length of 1/2 of your wrist
You will need to cut TWO pieces of your plastic lace.  For the first piece,
measure the length of the plastic lace to equal 4 TIMES the length of the chain you just measured.
For the second piece, measure the length of the plastic lace to equal 12 TIMES the length of the chain.  (You can add a little extra in length if you wrist is a little bigger)

STEP TWO

Take the smaller piece of plastic lace you just cut and and put one end through the end of the chain.
Then tape the end of the chain to a table or the floor to secure it in place.

STEP THREE:

Begin to braid your plastic lace in a square knot.  Make sure you tighten your knot as close to the end of the chain as possible.  To Begin your square knot:
1) Take the long piece of plastic lace that you cut and divide it in half.  Place the middle of the plastic lace underneath the center string.
2) Take the plastic lace on the left side and place it OVER the center string.
3) Take the plastic lace on the right side and place it OVER the lace you just laid across the center strings
4) Take the lace that you laid over the center string in the first step and run it UNDER the center strings and up through the loop you created in the first step.

Once you complete those four steps, tighten the knot as close to the end of the chain as you can. PULL TIGHTLY!

Then you are going to repeat those four steps again; beginning on the other side.


Pull the knot TIGHTLY!  Here is what the square knots will look like:

Repeat those steps, alternating sides, until you have knotted about half way down the center string.  Measure the bracelet to fit around your wrist. 

STEP FOUR:

Loop the end of the center string through the other end of the chain and fold over .  Once you've measured your bracelet, tape the ends of the center string to the back side of the bracelet. 
You can then continue knotting as normal.
Once you knot all the way to the chain, tie a plain knot with the lace that you have been braiding with on the back side of the bracelet.  Add glue to it before you tighten.  PULL TIGHTLY!

STEP FIVE:

Snip the ends of all the excess lace
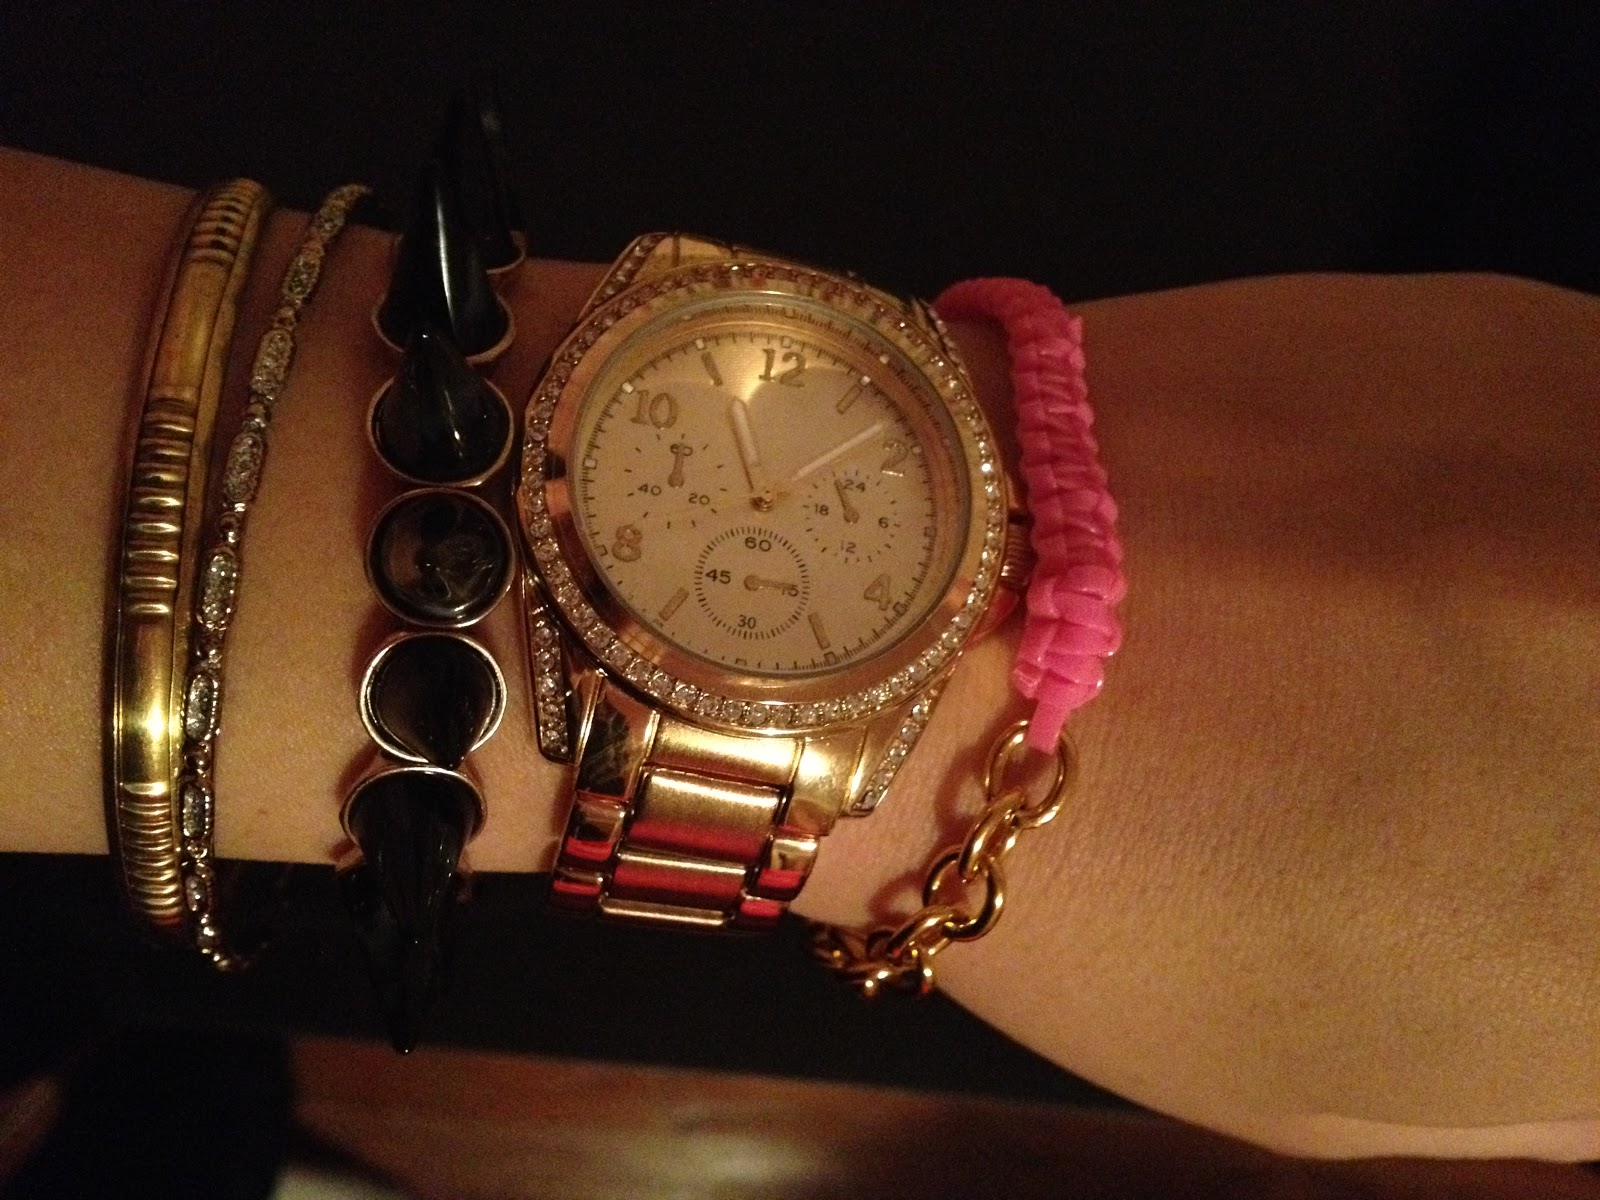
And you're done!! Here's the finished look!!
I hope you guys enjoy these bracelets.  They really are fun to make!! I would love to see how yours came out so post pics in the comments :)
XO
        Kate

Don't forget to FOLLOW BY EMAIL because I have a giveaway coming up!!!!

Sunday, November 4, 2012

Top 10 holiday gifts!


The holidays are right around the corner!!
Do you know what you are giving your friends and loved ones this year???
 
I always start my holiday shopping early so that I don't feel overwhelmed as the
days count down, and so should you!!
Start your holiday shopping early & give quality gifts that everyone will love!!
Mark. is suggesting their top 10 best selling items for the holidays this year.... here's what they are:


1. Sweet On Lemon Sugar Gift Collection. Set includes: get misty, whipped up and three's a charm in our best-selling lemon sugar scent, ready to give in our exclusive ribbon-printed gift bag.  This Collection is also available in other scents- Gimme Vanilla Cream & Lovin' Plum Berry.
 
2. Pretty Handy Hand Creams Trio. Set includes: hand it over in scents jasmine petal, plum berry and new vanilla cream, ready to give in our exclusive ribbon-printed gift bag. These are the best hand creams! They smell sooo good :)
 
3. Talk is Chic [phone case & lip gloss]. Part wallet, part protective phone case, this super-glam wristlet is the perfect gift for the tech-obsessed fashionista. With two mini glow-baby-glow lip gloss shades (girly girl & sweet talk) attached and slots inside for essential cards, it's her life on a (detachable) strap! Faux leather with sequin embellishments. This same design is also made by Michael Kors and sells for $75 (and without the lip glosses) so this one by mark. is a STEAL!!!!
 
4. Great Timing Watch. With rows of chains in place of a band, this big-faced watch has edgy-feminine flair. Lobster claw closure. 7" L (with 1 1/4" extender).  This watch has gold & silver tones, so you can wear it with just about anything!!
 
5. Great Ring Tones.  Set of three goldtoned rings with cute bow and rhinestone details.  Sweet Stud Earrings are a cute set to match!!  I have these myself- LOVE these!
 
6. Tech Savvy Clutch. It's a clutch! It's a tablet case! It's… both! You decide its usage; either way, it's adorably chic in kelly green with an equally bold blue lining. Faux pebbled leather with rose goldtone turnlock closure.  This bold color accessory is definitely in style for the upcoming season- So pretty!
 
7.  A Very Big Deal. Set includes fabulous framed cosmetic case that glitters for the holidays, In a Swirl Marbelized Lip Gloss, Star Status Eyeshadow Palette,  and Light Show Illuminating Face Powder.
 
8. All Lit Up. Lemon sugar fans (there are many!) will love this latest way to enjoy the scent. With 5% fragrance, it's definitely one sweet gift! Glass jar. Burn time approximately 32 hours. 7.5 oz.  This scent is amazing! You will love it!
 
9. Brush Hour [Mini Brush Set]. A best seller gets luxed up for holiday giving! With five professional-quality brushes, this kit is ideal for glamorously tackling touch-ups on the go. Faux leather with sequin embellishments. This set includes: case, eye shadow brush, eyeliner brush, concealer brush, lip color brush, and powder brush. This definitely comes in handy when traveling or just carrying a small clutch with you for special occasions! 
 
 
10. Mark. Very Sassy [Eau De Parfum Spray]. A fragrance to be reckoned with, amped up for lasting impact. Mark. Very Sassy lets fruity black currant, floral yellow jasmine earthy musk all have their say. Stir things up with a single spritz. 1.7 fl . oz. This is a scent you will love for every occasion! Ask me for samples! :)
 
 
As many of you know, I am a representative for mark.  If you have any questions,
feel free to contact me! :)
I'm extremely excited for the holidays this year! I hope you are, too!!
 
XO
        Kate


Friday, November 2, 2012

Ombre Style Nails

Check out this ombre style nail polish technique!!
It's simple to do and creates a really pretty look.
 
I chose three colors in the same color family.  I added the tangerine color for an autumn look, but you can choose any three colors you want! Go crazy with it!!
 
Paint each of the three colors on a makeup sponge starting with the darkest color on the top.  Once each color is painted in a stripe across the sponge, press onto nail- rolling the sponge from side to side.  Use a Q-tip and polish remover to clean up around your nails. 
Then apply your top coat as usual. 
 
 
Comment below and show me how you did your ombre stylr nails.  Also, be sure to
follow by email because there is a giveaway coming soon!!! :)
 
XO
       Kate

Wednesday, October 31, 2012

50% off ELF!

Check out this GREAT deal, ladies!!!
ELF is offering 50% their best sellers because their website was temporarily down for a couples days because of hurricane Sandy. 
This is an amazing deal & at 50% off you can get a lot for your money!!!
 Be sure to use the code: "FAVES"at checkout.  Happy Shopping!! :)
 
 
XO
    Kate


Personally, I would recommend the translucent matifying powder. LOVE that stuff!! It keeps me looking shine-free throughout the day.  Also, the contouring & blush duo is definitely great to have in your makeup collection- especially if you have to travel.  Two products in one! 
FYI- their palettes are also great!  I have the 144-piece ultimate eyeshadow palette.  The colors are super pigmented and last quite a long time. And $7.50 (at 50% off) for 144 colors- how can you go wrong?!?

Tuesday, October 30, 2012

Cosmetic Brush Holder

Hey ladies <3
 
So, I wanted to have my makeup brushes conveniently accessible to me while I'm doing my makeup and also have them look pretty while I'm not.  Soooo I came up with this :) 


I purchased a glass display jar from Michael's Craft store (yes, I love that store!).  Also from Michael's are the beans that the brushes actually sit in.  They are actually "bean bag filling".  I simply spray-painted them PINK to match the decor of my room!  Add your brushes and voila! Hope you enjoyed!
 
XO
       Kate
 
 
Let me know what you think!! I would love to see how you all store your makeup brushes :)

Wavy Hair

Hi ladies :)
 
I wanted to share some pics with you of my wavy hair that I did this morning.  The pics aren't the best quality- had to take them with my phone bc I misplaced my camera at the moment.
Let me know what you think!!
 
XO
    Kate


To get this look, I used a 1 1/4" curling wand from Hot Tools.  I love all of Hot Tool's hair tools!!

Sandy

Hey everyone!!

I hope everyone is safe and doing okay after hurricane Sandy!  After seeing pictures and posts on facebook, twitter, & instagram, I know that some people are having a really hard time with flooding and other disastrous situations :( My heart really goes out to everyone!! I wish I could be in a million places at once so I can help out. 


This is what I did during the storm last night :

  • I stayed updated on the storm and how everyone was doing on my computer & the TV.
  • I worked on my iPhone 4s case- little arts & crafts time :)
  • I also did my nails a cute pink color with some glitter
  • I also caught up on a little bit a reading - love this magazine :)
  • And of course I watched movies- The Wedding Planner is one of my faves!
For those of you that didn't have flooding and had power, what did you guys do?!?
I'm curious :)
Let me know!
 
XO
     Kate

Monday, October 29, 2012

Newly purchased NYX products

 
Hello ladies!!
 
I wanted to show you some new NYX products that I purchased and absolutely loving!!
Because I don't use cosmetics that test on animals, NYX is one of my favorite go-to brands. They even have the cute bunny logo on the back of all of their products which proves they are cruelty free!
 
The products that I purchased (from left to right)
  • Matte Bronzer in the color MBB01 Light.  I use this to contour the sides of my face.  It's a great color for me because I have light skin.
  • Blush in color PB27 Summer Peach.  I love this for fall because it's different than your basic pink blush.
  • Glitter Mania in colors Gold & Silver. These can be great for special occasions- Halloween and other holidasy coming up!
  • Jumbo eye pencils in colors: 608 Cottage Cheese, 609 French Fries, 623A Purple Velvet, and 601 Black Bean.
  • Eye Shadow Base in color ESB01 White.  Definitely a must-have in order to keep your makeup staying put all day long!

Let me know how much you ladies love NYX products, too! And if you haven't tried them yet, you don't know what you're missing! Try them and comment with pictures of the products :)

Don't forget to subscribe to this blog! Giveaways coming soon- Let's get 40 subscribers first!

XO
    Kate

iPhone Case


I'm so excited about the phone cover I made for my iPhone 4s!! I went to Michael's craft store and bought a bunch of rhinestones (all sides, shapes, and colors), pearl beads, some gems and other decorations that caught my eye.  I glued them all on with industrial glue and this is the result! :)
I still contemplating about doing the sides of the case.  It's already pink so it goes with the theme, but I think I might do them, anyways.  Tell me what you think!!
 
XO
        Kate
 
 
*I'm sorry, this picture really doesn't do it justice- it's a lot more "sparkley" in person!
 

Sunday, October 28, 2012

DIY Nail Polish Rack

  
Want a creative way to store your nail polishes without spending a fortune
 on wood or acrylic racks???


When I brainstormed ideas of storing my nail polishes, I knew I wanted to store them in a way so that I can see all the colors at one time.  I knew I didn't want to spend a fortune, and I contemplated making one myself. 
I compromised with myself by "making" this one.  I bought four desk organizers (on sale for $4 each at Michaels Crafts).  They have a black & white animal print on the sides! Right up my alley!! :)
I screwed the four of them to the wall together in one big rectangle.  Then, added my polishes! :)
 
Hope you love it as much as I do!
 
XO
         Kate


DIY Jewelry Holder


Jewelry Holder in a picture frame :)


What you will need:
 
~Picture frame of your choice
~Colored felt (any color you want!)
~ Hot glue gun & glue sticks
~Scissors
~Ruler
~Pen
~Pictures!
 
 
This project was so SIMPLE to do!! You can have it free standing or hanging on the wall.
 
The frame is a collage style frame (meaning they are all attached as one big frame). 
I began by mesuring and then rolled the felt into long strips that fit the individual
4x6 frame (vertical ones). 
I kept the strips in place using a hot glue gun.  Next, apply hot glue to the glass of the frame and add the felt strips to the glass.  Be sure to put the end of the felt roll face down. 
Add enough felt strips so that they are tight enough to hold jewelry pieces in between. 
As for the horizontal frames, I simply added pictures from one of my
favorite artisits, Alece Birnbach.  To customize it to you, add any pictures you want! Even ones of yourself with friends and family! :)  Finally, add your jewelry!!
 
XO
         Kate